ATR Harness Volume 1
This Honda Ruckus ATR wire harness blog will be a multi-part series covering many angles of the harness.
Today’s talk will be about the Honda Ruckus ATR harness for the Honda Ruckus GY6 swap. There have been a few harnesses made for the Honda Ruckus throughout the years now. One of the harnesses that have been around since the GY6 swap started is the ATR harness. These harnesses have progressed overtime to make it easier for the customer to install on their Honda Ruckus. I’m going to dig right into it and go over the pros and cons that we have dealt with over the years. First, I will say that this harness is a 99% plug-and-play harness for the Honda Ruckus if you keep the stock taillight, controls, headlight, etc. The only part that you must either pin-up or solder will be the two ignition wires from the harness to the back of the ignition.
Now let’s talk about the front part of the bike and address if you have charging issues. We at The Ruck Shop have done a YouTube video on how to check if your GY6 ATR harness is charging in your Honda Ruckus. if you have not seen it then click here. We go over tips and tricks to rule out what could be the issue with the charging in this helpful video. A common issue people have had is that the bike may stay on when the key is out of the ignition or turned off. This is caused by the ignition being pinned incorrectly. Lucky for you this is an easy fix. If you are standing in the front of the bike and looking towards the rear, you will notice that where the plug goes into the back of the ignition that there are three slots to be filled. You will want the wires to be in the left slot and middle slot, leaving the right slot open. Boom! Problem solved.
We have seen people use custom plates or brackets for cleaning up the front portion of the harness that sits in the battery box of your Honda Ruckus and let me just say that it is not needed. You can make your battery box look extremely clean without purchasing anything extra. (See picture below)
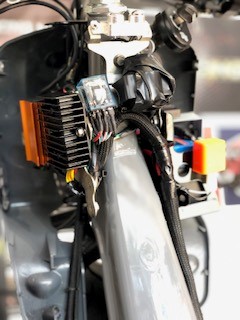
This was using the factory ECU mount along with lots of trial and error with fitting parts. You can see the harness still runs up the side of the frame and you still have access to all components like the clear relay, CDI, rectifier, and flasher relay. The majority of the wires were taped and ran behind where the rectifier and CDI are on the side of the OEM Honda Ruckus ECU bracket. This gives it a super clean look without having to buy anything extra to take up space in the box.
It is all about patience and practice when it comes to running/ hiding the wires. As a side note: Before you go on and start hiding or trimming wires. Make sure all the functions on the bike are working first! That is including CHARGING. The last thing you want to do is get your harness all pretty and cleaned up then go for your first start-up and have no power, spark, power to controls, etc. So, a big pro tip is to plug everything in beforehand, perform a test run on ALL electrical components. Now some of you want to do a full wire tuck and there is nothing wrong with that, but I will say that if you ever run into any electrical issues, you will be in for a long weekend of untucking. Keep that in mind if that is the route you are considering going on.
In the next blog post on the Honda Ruckus ATR harness, I will go more into detail about this harness and points that I personally like to cover as well as where I trim off, etc. This will be a little more detailed and dig into the harness inside the loom and electric tap exterior. This is not necessary for everyone to do but I will get into how I like to personally do my harnesses and what I have found over the years while doing these. I hope you have enjoyed this short intro to the Honda Ruckus ATR harness blog and stay tuned for the next couple of parts of this blog series.